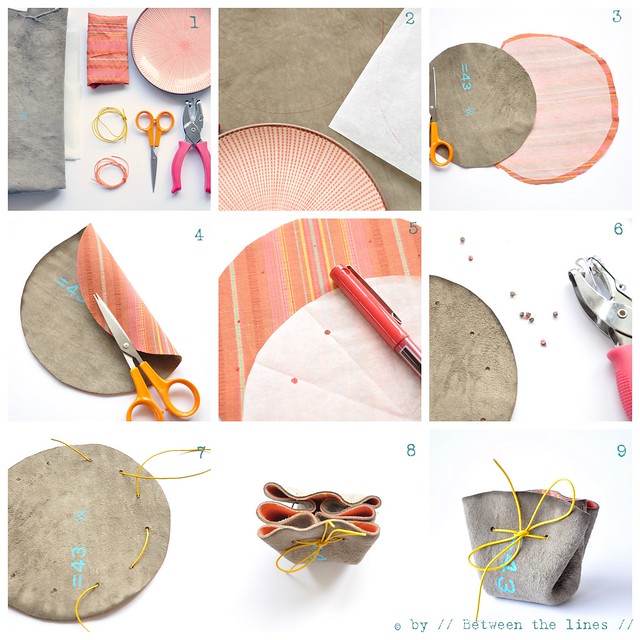
Wednesday, March 30, 2011

DIY Gifts | Simple Drawstring Coin Purse


what you'll need:

- leather scraps - or alternatively, any other material that will hold up, like felt, oil cloth, heavy weight cotton (which won't fray much in my opinion since it's cut in a circle)
- optional: fabric scraps and Vliesofix for the inside
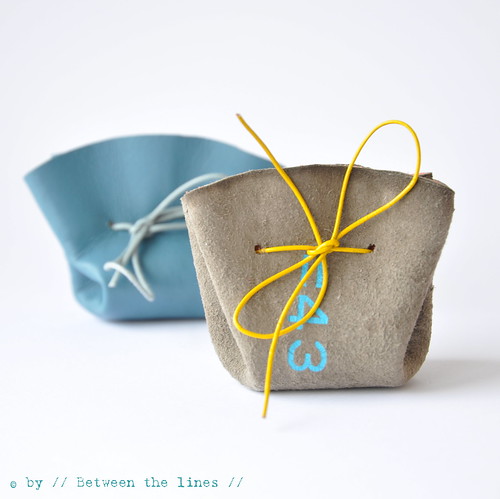
- a plate, a dish or a bowl to trace the circle if you don't have a compass handy Note: for the purse in the above pictures, which is about 6cm wide and 6cm high, I used a dish with a 16cm diameter.
- leather shoe lace, ribbon, biais tape, ... for the closure
- a hole puncher
- iron
- scissors

Steps

1. Trace plate, dish or bowl on the wrong side of the leather. Trace the same circle onto the paper backing of the Vliesofix, if you decide to line your little purse. ~ pic. 2
Note: for the purse in the picture I actually used the wrong side of the leather for the outside because I liked the number stamp on the back so much, the contrasting blue against the taupe color of the leather - and 43 also happens to be my age - double strike!

2. Cut out, however leaving an extra margin when cutting the Vliesofix. Iron Vliesofix onto the fabric. ~ pic. 3

3. Gently pull off the paper backing from the fabric. Do not throw away the paper backing as you'll still need it later. Iron the fabric onto the back of the leather. Next, trim the edges. ~ pic. 4

4. Take the paper backing and cut out the circle you traced onto it earlier on. You will now make 12 holes in it, about 1.5 to 2cm from the edge, and equally spaced out around the curve of the circle. In order to do this somewhat precisely, however without doing the math, what I did was fold the paper circle in half, next unfold again, punch holes at each end. Fold again, perpendicularly onto the first one (to make quarters), next fold open again and punch a hole on either side. Next, fold again, unfold, punch hole - basically you fold the paper same way you would cut a pie in 12 same size pieces. Once you've punched the twelve holes, place the paper on the wrong side (the lined sized, if you lined it) of your leather circle and mark the 12 holes with a pen. ~ pic. 5

5. With your hole puncher, punch the holes, using the marks as a guide. ~ pic. 6

6. Thread your ribbon, leather shoe lace, biais tape, ... through the holes. Pull both ends so to make folds and close the circle.

Tuesday, March 29, 2011

FLUFFY POM-POM TOPPER


Make a big statement with a fluffy pom-pom! Make it one color or two for different looks! Once the gift is unwrapped, it can also be used as a luggage tag!

For this project, you will need yarn (in the examples at the right, we use Wool-Ease Thick & Quick in Fisherman with Vanna's Glamour in Diamond for the gift at the left and Alpine Wool in Chili and Olive for the gift at the right) along with a pom-pom maker.

Step 1: Make your pom-pom. To make your pom-pom, follow the directions on the pom-pom maker package. Leave the strand of yarn used to secure the middle of the pom-pom long; you will use this to secure the pom-pom to your package.

Step 2: Tape the end of the yarn to your package and wrap it around the package several times in one direction. Cut the yarn and tape it to the back of the package. Repeat this step, wrapping the yarn around the package in the other direction.

Tie the pom-pom to the yarn wrapped around the package at the point where the yarn crosses the top of the package.

Monday, March 28, 2011

DIY Wrap Gifts | WOVEN WONDER GIFT TOPPE


Turn any package into a mini loom! If you teach the recipient how to tie off the edges, they’ll have a little coaster or place mat in addition to the gift inside.

For this gift topper, you'll need two types of yarn (the example below uses Wool-Ease Thick & Quick in Citron and Lion Wool in Dark Teal), tape, and a tapestry needle, in addition to your wrapped gift.

Step 1: Tape the end of the first yarn to the back of your package. Wrap yarn around package lengthwise, keeping strands close together (aprox ¼" apart). Wrap about 20 times for a coaster, 50 for a placemat OR any even number of times. Once wrapped, cut yarn, remove the tape holding the other end of yarn and tie the two strands together, being careful not to distort the front lineup. Trim tails.

Step 2: Cut about 3 yards (108") of second yarn (or enough yarn to go around your package in the other direction several times). Tape one end to back of package as before. Thread other end of yarn through tapestry needle.

Step 3: Wrap yarn around to front of package. When you reach the crossing yarns, weave tapestry needle over one strand then under one strand until you reach the other side. [For more tips on weaving,
Step 4: Wrap yarn around back of package to front again. Weave tapestry needle through crossing yarns again, this time working under one strand first, then over one strand to the other side.

Repeat steps 3 & 4 10 times for a coaster (20 strands), 30-40 times for a placemat, depending on the size of your box. Keep the number of strands an even number, to make tying off easy. When you run out of yarn, remove tape from starting end and tie the two strands together in the back. If you’re not finished weaving yet, tape a new strand of yarn to the back and begin again.

Sunday, March 27, 2011

Wrap Gift | How to Make a Paper Spike Bow


Here is what you need:
Wrapping paper or craft paper, glue- any craft glue that dries clear,
a sharpened pencil, scissors, a cup or other circular object to trace around,
a damp cloth to wipe up the glue that you are sure to get on your fingers!


Trace & cut out several circles from your paper, 5 or 6 should do. Fold each circle in half, half again, and again (you will have 8 sections).
Cut on each fold line about 3/4 of the way, leaving the center in tact.
Roll each cut section by holding the pencil at an angle to one corner.
As you roll the paper around the pencil it will make a cone.
Add a dab of glue near the end. If your paper is heavy,
you may have to hold it in place for a moment so the glue can set.
This is where I get glue all over my fingers and
use the damp cloth to keep clean.
Now you are ready to assemble your bow!
Layer each circle one on top of the next with a dab of glue.
Be sure to off set each layer so the points land in between the
previous layer's points. When you get to the very middle,
use the eraser end of your pencil to stick the last layer in place.
What a nice way to top off a gift!

Saturday, March 26, 2011

Idea Gifts | Wrapagami


Lay a button-down shirt flat with the back of the shirt facing up. Slide your gift box inside the shirt.

CLX shirt ht1 wrap 1209 de 99902289 Gift Wrapping Ideas   Wrapagami

Fold the top and bottom of the shirt over the gift. Use a safety pin to secure any excess fabric, if necessary.

CLX shirt ht2 wrap 1209 de 21130948 Gift Wrapping Ideas   Wrapagami

Cross the sleeves so they wrap around the back of the box, then flip the gift right side up.

CLX shirt ht 3 wrap 1209 de 21709645 Gift Wrapping Ideas   Wrapagami

Tie the sleeves into a square knot. If your gift is narrow, you may be able to tie the sleeves into a bow.

CLX shirt ht3 wrap 1209 de 69009855 Gift Wrapping Ideas   Wrapagami

Friday, March 25, 2011

Gift Idea | Embellished Ribbon

This preppy treatment is a ribbon tied onto a loop and threaded belt-style through a second loop.

Thursday, March 24, 2011

DIY Gifts | Butterfly Box and Table Card


Directions:

For box:
1. Begin with a 12 x 12 inch sheet of light green paper. Score a line 3 7/8 inches in from one edge, parallel to the edge, running the length of the paper. Repeat on remaining three sides. This piece will become the box lid.
2. Cut the score lines on two opposing sides of the page up to the center scored square.
3. Stamp each of the four square flaps with a different bird stamp using blue ink.
4. Fold the corner squares in and secure with double-sided tape.
5. Score a second 12 x 12 inch sheet of light green paper 4 inches in on all sides, as in Step 1. Repeat Step 2 and tape box together.
6. Stamp the orange cardstock with various teal and red butterflies, and cut them out with a craft knife or precision scissors.
7. Stamp the gold cardstock with orange butterflies and cut them out. You will need approximately three large butterflies and four small ones in all.
8. Cut 1/4 inch strips of orange cardstock: one 4 inches long, three 3 inches long, and three 2 inches long.
9. Roll the 4 inch strip into an oval ring and attach one short end to a small butterfly. Tape the other short end of the ring to the center of the box.
10. Roll the three 3 inch strips into rings, securing with tape. Attach each one to a large butterfly. Tape the bottoms of the rings to the box, so the large butterflies face each other surrounding the first butterfly.
11. Roll the three 2 inch strips into rings and tape them to three small butterflies. Tape rings to the box, using them to obscure the rings in the center of the box between the large butterflies.

For card:
1. Cut a 7 x 5 inch piece of pastel green cardstock. Stamp a bird in the center using blue ink.
2. Score across the cardstock about 3 1/2 inches from the bottom on both sides of the bird. Use a craft knife to cut out the part of the bird above the score line.
3. Stamp a small butterfly onto gold cardstock using orange ink. Cut out the butterfly with scissors or a craft knife on a cutting mat, and tape it to the end of the wire.
4. Cut a small hole along the fold to the right of the bird and insert the other end of the wire, securing it with tape inside the card. Tip: Use scissors, a thumbtack, or a paper clip to create the hole.

Wednesday, March 23, 2011

DIY Gifts | Zipper brooches


Supplies:
Fabric marking pen or chalk
Hand-sewing needle
Nonwoven material scrap for pin back (suede, leather, synthetic leather, or felt)
Pin closure
Pins
Ruler
Scissors
Sewing machine
Thread to match zipper tape
Zipper tape, 56 inches (or one 28-inch zipper, separated)

Create flower petals from a zipper
The brooch has two six-petal layers, plus a center swirl. After you cut the zipper up, the parts are swift to baste and sew by machine.

1. Prepare the zipper. You need zipper tape and teeth only. Cut away stops, and remove the slider. Press the zipper tape if it needs it.

2. Segment the zipper. Cut six 4-inch lengths for the larger petals, six 3-inch lengths for the smaller petals, and one 8-inch length for the center.

Wriggle the scissor blades between the teeth to cut the zipper tape.


3. Gather to give the petal shape. Machine-baste close to the long tape edge on a zipper petal length. Pull the bobbin thread to gather slightly (the zipper curls toward the tape edge). Push the gathering to the middle. Repeat for all petals.


Pull the bobbin thread to gather each tape edge.

Tip: Plan the pieces If you don’t use a single zipper tape, you should plan and mark the cutting lines on a separating zipper or multiple shorter zippers. Arrange the cuts so you don’t run short for any pieces.

4. Form and sew the petals. Fold a gathered zipper length in half. Open the fold at the cut ends, and overlap the tape with the zipper teeth to the outside. Pin, or hold in place. Stitch the petal center through the overlapping tape from the cut ends to the petal’s outer tip. Repeat for all remaining petals.


5. Make the flower center. Baste close to the center’s long tape edge. Pull the bobbin thread to gather the center into a spiral. Make the spiral tight at the beginning; loosen the gathers for the outer rings. Tuck the end under and baste in place.


Gather the flower center zipper tape into a spiral.


Assemble the flower, and make it a pin
With some hand-sewing, you’ll build your pin from the petals and center. The finishing touch is a quick pin backing.

1. Join the petals in two layers. Sew the six large petals together, adding one at a time to create a circle. Lap each petal’s base over the next, clockwise or counter-clockwise (it doesn’t matter as long as you’re consistent!). Hand-stitch them together securely. Arrange and sew the six small petals in another circular layer.


Hand-stitch the petals together.

2. Sew the petal layers together. Place the smaller layer over the larger layer. Offset the petals to fan attractively. Pin in place. Secure the petals by hand-sewing through both layers close to the middle.


Arrange the two petal layers into a full flower.

3. Finish the flower, and Add a pin closure. Slipstitch the flower center in the center of the petal layers. To attach the pin and back, cut a 11⁄2-inch circle from the backing fabric. Sew the pin closure to the circle, and then hand-sew the circle to the flower’s bottom petal layer. You can hide your stitches beneath the smaller petal layer and flower center.


Tuesday, March 22, 2011

Diy Gift | Key Chain as Gift Tag


Add a fun touch to a gift box by using a bright key chain as a tag, attached with big rubber bands in place of ribbon. The recipient will love it, even if it doesn’t go with a bow-wrapped Lexus in the driveway.

Monday, March 21, 2011

Creative Gift Wrap Ideas


Napkins as Gift Wrap
Got a bottle of wine or champagne to give? Why not wrap it using a new napkin? In fact, wrap a set of six napkins around the bottle and give a duel gift? says you simply need to cinch it at the top with a pretty ribbon. Simple, beautiful and easy.

Sunday, March 20, 2011

DIY Gifts | TREES PLEAS


Supplies Needed:

  1. diy project PDF
  2. cutting mat
  3. ruler
  4. x-acto knife
  5. paper stock
  6. card stock
Directions:
  1. Print pages 2 and 3 (gift tags) of this PDF at 100% onto card stock (8.5×11) of your choice
  2. Align your ruler and cut out gift tags. Use the back of your x-acto to score fold
  3. Print pages 4 and 5 of this PDF at 100% onto text stock (8.5×11) of your choice
  4. Wrap and ribbon your gift

Friday, March 18, 2011

DIY Gifts | Fabric origami box


Begin with two squares of stiffened fabric, one for the bottom and one for the lid. (Mine were 6" x 6.")

1. Mark the center of the square by folding the fabric into quarters or measuring. Bring each corner of the fabric to the center point and press the creases.

2. Bring one edge of the resulting square inward until it touches the center point and make a crease. Repeat with the other three sides.

You'll end up with four creases running through the square.

3. Open up the top and bottom triangular flaps, leaving the side flaps folded in. Then pinch the sides of the top flap inward.

4. Bring the point of the top flap over the "wall" you just made and press it down to the bottom of the box.

5. Repeat with the opposite flap. My box stayed folded all by itself, but you could add a couple dots of glue to secure the flaps if needed.

Make a lid for the box using the other piece of fabric. The lid will need to be slightly larger than the bottom, so when you get to step 2, don't fold all the way to the center point. Fold each side to a point a quarter inch short of the center.

GIFT TAGS & BOWS


Supplies Needed:

  1. diy project PDF
  2. cutting mat
  3. ruler
  4. x-acto knife
  5. full-sheet (8.5×11) color printing labels (optional)
  6. 2-1/2-inch circle punch*
  7. paper stock**
  8. card stock***
Directions:
  1. Print pages 2 thru 3 of this PDF at 100% onto card stock (8.5×11) of your choice or label sheets
  2. Cut out gift tags with your 2.5 circle punch
  3. Print pages 4 -7 of this PDF at 100% onto text stock (8.5×11) of your choice

Monday, March 7, 2011

Mini Lemon Bread Favors


For a simple favor that's an easy takeaway, try mini lemon breads! These darling little bread loaves will charm your guests and are inexpensive to put together.
A good recipe is key! We really like this one.


You will also need mini loaf pans, parchment or craft paper, string or twine and tags.


Make sure you also have a pretty surface or tablecloth to display the breads on.


Measure a piece of paper that will be a few inches shorter on each end than your loaf of bread. Fold over once so the raw edges don't show and wrap the paper around the middle of the bread.


Tie with twine or string and a tag.

It's that simple!

Sunday, March 6, 2011

Irish Cream | Diy Project


Materials
Card stock
Downloadable Tags
Mason Jars & Ribbon
Homemade Irish Cream


Instructions

1. Download and print out labels on card stock (I had ivory on hand). Cut using gray guides, I used a rounded corner punch on two opposite corners. Also, hole punch top left corner for ribbon.

2. Make recipe of Irish cream and fill mason jars (be sure to wash jars first).

3. Attach tags with ribbon, using 21″ of ribbon on each jar.

Saturday, March 5, 2011

Feather wrap | Gifts


What you need:
Tissue paper, feathers (from craft shops), sticky tape, scissors

What you do: Wrap your gifts in a few layers of plain white tissue paper. Next, lay a single sheet of tissue paper down flat, place a feather in the centre of the paper, put the gift carefully on top and then wrap so the feather is trapped in place.