Showing posts with label Wedding. Show all posts

Monday, November 30, 2009

Tea Tins


Materials

2.6″ Round Tin
Full Sheet Labels
Round Tea Bags
2″ Hole Punch
X-Acto Knife
Straight edge
Healing Mat
Color Printer
Vellum Paper (optional)

NOTES:
The tea tin requires 2 labels: (a) 2″ circle for the top AND (b) 6″ x 1″ rectangular to wrap around the side

Instructions

1. Create artwork for the top and side labels. Since you have 2 areas to work with, the possibilities are endless. Keep in mind though – if the tin is sitting on a table – the tops will be more visible than the sides. Suggested: Put your name or initials on the top and the kind of tea on the sides.

Tips about preparing artwork for print: If your design has bleeds (artwork that flush with the edge of the label) make sure you extend your artwork past the “cutline.” This allows you to avoid those pesky and unwanted white edges for when you trim the labels. Also, include cropmarks to guide you in cutting out the rectangular label.

2. Print out your designs – in color – onto the full sheet labels.

3. Using the 2″ circle punch, punch out the circular labels for the lid. To ensure your punch is centered, turn it upside down so you can see the design and where you are punching.

4. Adhere the circular label to the center of the tin’s lid.

5. With a straight edge and x-acto and using the cropmarks as guides, cut out your wrap labels.

7. Adhering the wrap label is a little trickier. Start in the center but allow the label to touch just enough so that it is barely sticking. This allows you to make adjustments so you can ensure the label is positioned squarely with the tin. Once straight, press the label from the center to its outer edges until it wraps all the way around.

8. Fill the tin with just enough tea bags (about 10 bags).

Optional…You can also include a round vellum insert to sit on top of the tea bags. This gives you another area to add artwork or information such as instructions on steeping the tea or a personal note from the bride and groom!

Thursday, November 26, 2009

Wristlets and Boutonnieres


Materials

(All these items are available at most leading craft stores)
• 22″ lengths of ribbon
• Small artificial flowers in matching colors
• Small artificial leaves
• Range of pearls, beads and small ribbon flowers
• Feathers in co-ordinating colors
• Small dried twigs and dried grass (found in your garden)
• Green floral tape, available from most floral warehouses
• Co-ordinating ribbon to wrap around the boutonnières
• Favor boxes
• Glue gun
• Scissors

Steps for the Wristlets:

1. Seal the edges of the ribbon lengths with a lighter so they don’t fray.
2. Cut several flower heads from their stalks so they’re flat underneath.
3. Find the center of the ribbon length and start gluing the flower heads on in any pattern you like.
4. Glue some pearls or beads to the center of the flowers, or to the side, making sure to keep design balanced.
5. Cut pieces from the feathers and glue them in under the flower heads.
6. Cut the stalks off the leaves and glue a few in under the flowers.
7. You can glue several flowers together right in the center of the wristlet (for a more ‘corsage’ look), or spread them over the middle 5 inches.
8. Make sure to clear the glue ‘whiskers’ away.
9. Keep adding to heat’s content until you feel the wristlet is finished.

Steps for the Boutonnières:

1. Cut one of the flowers leaving a 2″ stalk underneath.
2. Choose a few strands of dried grass and cut the ends off leaving a 2″ stalk, same as the flower.
3. Do the same with a little twig or a few artificial leaves.
4. Dab a little hot glue at the base of the flower to semi-secure the grass, twigs and leaves together.
5. Wind the floral tape around the base of boutonnière, starting at the top just under the flower head. When using floral tape, stretch it out thin, then wrap, stretch, then wrap, rotating the boutonnière as you work. You might have to practice this a little bit before you can stretch the tape without breaking it!
6. Finish off by wrapping a matching colored ribbon around the boutonnière base, dabbing a little hot glue at the start and at the end.
7. Complete the boutonnière with a pin.

Friday, August 7, 2009

In the Bag | Gifts Ideas

Shiny boxes have their place, but sometimes you want to hint at the gift inside the wrap. So transform ready-made voile drawstring bags into fun packaging with this simple embellishment. Stitch 1/2-inch tinsel pom-poms to the outside of the bag. Enclose a small gift and add a round, metal-edge vellum gift tag for the finishing touch.

Monday, July 20, 2009

DIY WEDDING PILLOW BOXES

Oh my…how fun would it be to have feathers thrown as you walk away for the first time as husband and wife. Not a big fan of feathers? You could substitue them for paper mache confetti, pom poms, or the traditional rice option. I love the little quote Laurie came up with to accompany your pillow boxes….


What You’ll Need
Decorative Paper (text weight, not cardstock)
Cardboard Pillow Boxes (I used 3″ x 3.5″ x 1″)
Ribbon
Feathers
Scissors or X-acto knife
Paper glue
Pencil

Resources:
The ribbon is from the Martha Stewart Craft collection. It’s a woven ombre and the color is brick/moonstone.
The papers I used are made by Anna Griffin Inc and Screen Prints.
Feathers are available at any craft store.
Pillow Boxes can be purchased online though The Paper Zone or Packaging Specialties

Instructions
1. Use one of your pillow boxes as a template. Lay it down on your decorative paper and trace around it using a pencil. Trace two for every pillow box you will be covering. (see figure 1)
2. Cut the shapes you just traced using scissors or an X-acto knife. (see figure 2)
3 Coat one side of your box with a thin, even layer of glue and adhere one of your papers. Repeat this step on the opposite side of the box.
4. When the glue had completely dried, close one end of the box by folding in the pre-scored flaps. (see figure 3)
5. Cut a length of ribbon, wrap it around the middle of the box a couple of times and tie it off with a knot, and then a small bow. (see figure 4)
6. Fill your boxes with feathers, leaving the ends of the feathers sticking out. (see figure 4)
7. Use your computer and printer to create a small tag for your box with instructions for your guests. For my tags I wrote “When the newly weds walk your way, toss these feathers and shout ‘HOORAY”. Cut out your tags and stick them on using a dot of glue. (or you can print on label sheets and stick them on your boxes) (see figure 5)
8. You can also create a larger sign with instructions to place near your displayed boxes. (see figure 6)
9. Arrange your “feather pillows” in a box, bowl or basket for your guests to take. Have your guests shower you with feathers as march back down the aisle as newly weds, or as you depart at the end of the evening. (see figure 7)

Sunday, July 19, 2009

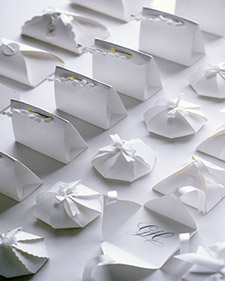
White Favors: Small Packages How-To


Use any basic card stock for all of these small boxes.

Pyramid Box
1. Enlarge the template, trace it onto paper, and cut it out. Make slits as marked with a utility knife. Using a bone folder, score the paper on the dotted lines.

2. Fold up all four flaps, forming a pyramid. Cut two pieces of ribbon, each one long enough to wrap around the box. Starting on what will be the inside of the box, slip one ribbon through a slit, wrap around outside, and slip through opposite side. Pull ribbon so two sides come together; tie. Thread second ribbon through remaining two sides, wrapping around outside; pull ends together, and tie. Tuck excess ribbon into box.

Pyramid Box PDF

"Kiss" Box
1. Enlarge the template, and trace it onto paper. Working just outside the lines, cut out the shape with paper edgers of your choice. Punch holes through ends of flaps as marked. Using a bone folder, score paper on the dotted lines.

2. Fold up all flaps. Cut ribbon a little bit longer than the diameter of the bottom of box; thread it through all the holes. Cinch two ends of the ribbon until sides close the "kiss." Tie a bow.

"Kiss" Box PDF

Long Box
1. Enlarge the template, and trace it onto paper. Cut out the left and right flaps with scissors. Using paper edgers of your choice, cut the top and bottom flaps just outside the lines. Punch holes in all four flaps as marked. Using a bone folder, score the bottom on the dotted lines.

2. Fold in the left and right flaps. Slide a short length of silk ribbon through the two holes, and tie the two sides closed. Fold top and bottom flaps in; tie with a second piece of silk ribbon. Finish with a bow and a little paper "button" or tag.

Long Box PDF