Showing posts with label fabric. Show all posts

Thursday, July 21, 2011

DIY Gift | CREPE + LACE FAVOR CRACKERS


Supplies:

Cardboard tube about 4-5 inches long (paper towel rolls and wrapping paper tubes are good sources)
Lace fabric
Crepe Paper
Scissors
Double stick tape
Very sturdy thread or twine

Instructions:

1. Begin by cutting lace fabric and crepe paper into rectangles. The shortest side of the rectangle should be long enough to wrap around the tube - usually about 6-7 inches. The longest side should be the length of the cardboard tube plus an additional 6-8 inches. Once you've determined your dimensions write them down so all your favors will be uniform.

2. Wrap crepe paper and lace fabric around tube so that the lace fabric faces outward as shown. Secure with double stick tape. Then tie one end with twine. Fill with candy or other favor item and tie remaining edge closed.

3. Optional: Add stars or other adornments to all or a few of the favor crackers.

Monday, May 16, 2011

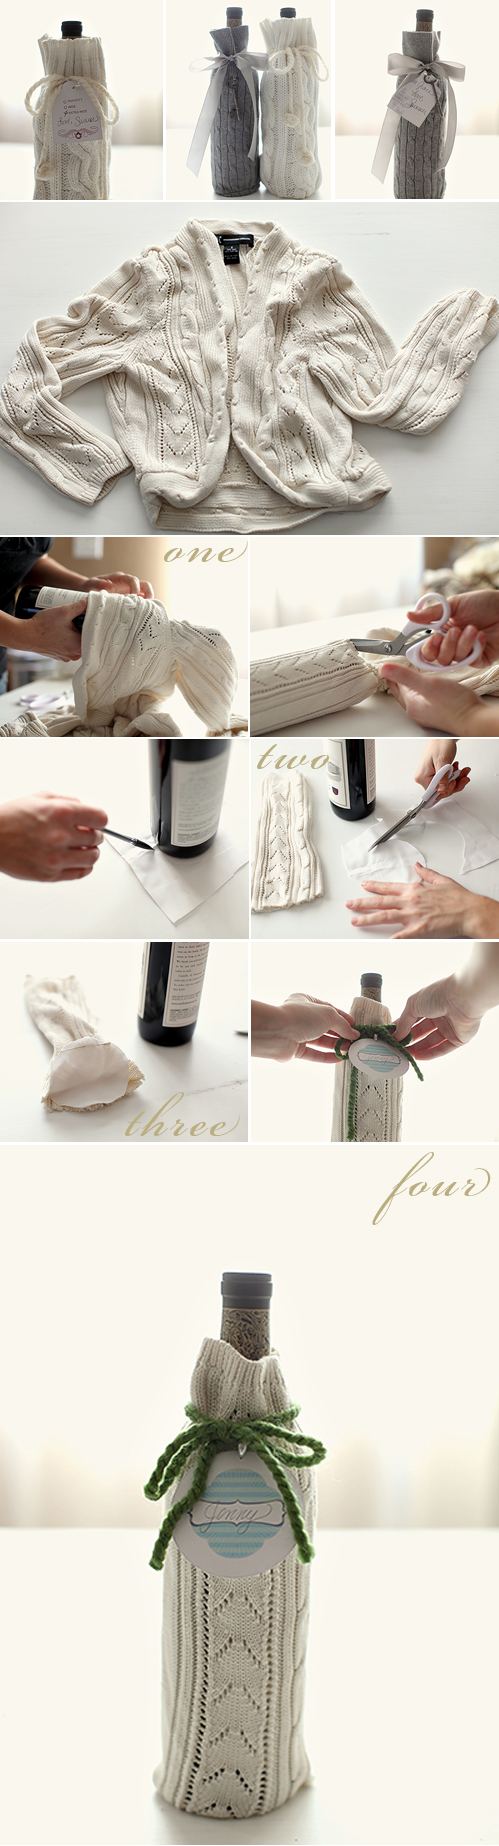
Making Gifts | Wine Bottle Gift Wrap


Materials:

1 old sweater (I scour the thrift stores!)

2″-3″ of Fabric

Sewing Machine, or needle and thread!

Fabric scissors

Ribbon, yarn, gift tags etc… for embellishment
1. Once sweater is washed, start by inserting the wine bottle into the sleeve of the sweater. The sleeve should start just below the top of your wine bottle. Mark the sweater with length of your bottle, pull out the wine and cut the sweater sleeve off.

2. Place your bottle on the small square of fabric and trace a faint circle around the bottle. Give yourself an extra 1/4″-1/2″ outside of the bottle. Cut out this circle.

3. Turn the sleeve inside out and pin your fabric to the cut end of the sleeve. Sew together. Turn right side out and voila!

4. To complete, thread yarn through the sweater, or affix ribbon.

Friday, March 18, 2011

DIY Gifts | Fabric origami box


Begin with two squares of stiffened fabric, one for the bottom and one for the lid. (Mine were 6" x 6.")

1. Mark the center of the square by folding the fabric into quarters or measuring. Bring each corner of the fabric to the center point and press the creases.

2. Bring one edge of the resulting square inward until it touches the center point and make a crease. Repeat with the other three sides.

You'll end up with four creases running through the square.

3. Open up the top and bottom triangular flaps, leaving the side flaps folded in. Then pinch the sides of the top flap inward.

4. Bring the point of the top flap over the "wall" you just made and press it down to the bottom of the box.

5. Repeat with the opposite flap. My box stayed folded all by itself, but you could add a couple dots of glue to secure the flaps if needed.

Make a lid for the box using the other piece of fabric. The lid will need to be slightly larger than the bottom, so when you get to step 2, don't fold all the way to the center point. Fold each side to a point a quarter inch short of the center.

Saturday, August 1, 2009

Fabric Envelopes


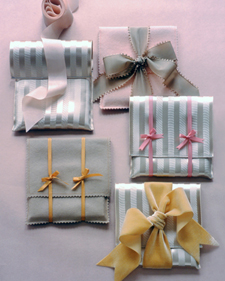
Well-chosen compact discs are always appreciated gifts. Personalize the CDs by slipping them into delightful hand-stitched pouches. The soft envelopes can be used over and over, as sachets or as small cases for travel toiletries. You can also vary their size and shape to fit blank books, pencils, diaries, or eyeglasses.

These pouches can be made out of wide ribbon or felt. For a ribbon pouch, you'll need a piece that is 6 inches wide and 17 1/2 inches long. Make a small hem at each end; to make the hem, turn the raw edge under 1/8 inch, press, and stitch close to the pressed edge. For a felt pouch, cut a piece 6 1/2 by 17 1/2 inches.

With wrong sides together, fold fabric 5 inches from the bottom; press. Pin each side; for ribbon, stitch as close to edges as possible. For felt, use a 1/4-inch seam allowance; trim seams with pinking shears. Place CD inside, and fold top flap over. Finish with a wide satin ribbon tied into a bow or a velvet ribbon tied into a knot. Or tie two narrow ribbons into bows, using tweezers to make crisp loops.