Monday, September 12, 2011

forcing paper tulips


Supplies:

- Double sided paper for the flowers and leaves, cut in to 1 1/2 inch square x 6

- 1″ circle out of matching cardstock

- green chenille pipe cleaner for stem

- small rick rack for flower stamen

- adhesive

- scissors

- template (print and cut to fill a 8 1/2 x 11 sheet)

Now, let’s get started.

Step 1

1

Get everything cut first. I chose some pink patterned paper for the petals. I prefer double sided paper for this project because you will see both sides. If you don’t have double sided paper, you can always finish the other side with chalk, ink or paint.

Step 2

2

Curl each petal around your finger to shape them. You don’t have to be perfect about it. In fact, less perfect is best!

Step 3

3

Apply your adhesive to the center cut on the inside of the petal. I went ahead and did it on all my petals so I could make them in an assembly line.

Step 4

4

Fold one side on to the adhesive and secure it. Then fold the other side in. The petal starts to take shape.

Step 4

6

Your finished petals should look like a bunch of painted finger nails when you are done. Just kidding. No I’m not. They look like fake finger nails.

Step 5

7

Take your 1″ circle piece and poke a hole in the center. The hole needs to be small so just use a large needle or pick. If it’s too big, it won’t hold the stem in place, as I learned from experience.

Step 6

8

Slide your circle on to the pipe cleaner. Then fold the top down to make a little nub.

Step 7

9

Tie a piece of rick rack on the nub. This is your stamen. I waited to trim mine down but you can do it now if you want. Just leave about 1/2″ to stick up to the top of the petals.

Step 8

10

Now we start the flower assembly. Begin by applying adhesive to the bottom of each petal. Mount on the circle using it as a base.

Step 9

11

Alternate petals on each side to build the flower. Again, it doesn’t have to be perfect but you don’t want any gaps when you are finished.

Step 10

12

Apply the second set of petals to the outside of the first.

Step 11

14

Once all four sides are covered, use the last two to cover over the first two. This gives some dimension to the flower. Slide the stem down inside the flower until the stamen is just peeking out.

Step 12

15

Take your leaves and curve them over in the same way we curved the petals. (The paper I showed in the supply photo is different than this because I ran out and did the supply list last.)

Step 13

16

Apply adhesive to the bottom inch or so of each leaf. If you think about how tulip leaves grow on the stem you realize that the stem grows up the middle of the leaves.

Step 14

17

So we apply the leaves curling it around out pipe cleaner stem. I started with the smaller one at the top and staggered down to the largest, which is how they grown. Curl any left over pipe cleaner up and around the base.

Step 15

Put your finished tulip in a flower pot or vase and you are done. I put mine in a vintage blue ceramic gravy boat with some of that floral moss. I like how the tulips move and are a little floppy just like real tulips.

Friday, September 9, 2011

How to tie a bow

Learning how to tie a bow is easy with a little practice, and is a wonderful skill to have for gift wrapping, card making, and more.


1. Measure out your ribbon by wrapping the ribbon around your box twice – cut your ribbon length. Leave enough extra ribbon so you can trim the edges again, if necessary, after your bow is tied.

Step 1_how to tie a bow

2. Wrap ribbon around the box from the bottom to the top. Hold ribbon taut around the top of the box, and with your right hand pull the length of ribbon on the left over and under to create a single tie, as you would when tying your shoe.

Step 2_how to tie a bow

3. Place your left thumb onto the ribbon to hold the tension and pull the ribbon length of the right side up to create a loop.

Step 3_how to tie a bow

4. Pull the loop to the left as you use your left hand to take the ribbon length around the loop.

Step 4_how to tie a bow

5. Using your left thumb you can push the ribbon length under the first loop, then through the opening. Use your right hand to pull up to create a second loop.

Step 5_how to tie a bow

6. Pull the two loop ends to create an even bow.

Step 6_how to tie a bow

7. Tighten the bow to your desired length.

Step 7_how to tie a bow

8. To create even edges, pull together both ribbon tails and cut at the same location. Cut at any angle you please. Sharp scissors are a must!

Step 8_how to tie a bow

Ta da!…the perfect bow. Now finish off with a decorative gift tag and note to make your gift special and unique.

Monday, September 5, 2011

How to make boxes from paint swatches


If you've got paint chips sitting around begging to be made into something, try folding them into boxes for paperclips, thumbtacks, party favor candies, or tiny gifts. I made these from Behr swatches, available at Home Depot.

You'll need paint swatches, double-stick tape, an X-acto knife, ruler, and cutting mat.

For the box bottom, cut a 1/2" strip off each of the two rounded ends of the swatch. You should be left with a 5" x 5" square. At a point slightly more than 1 1/2" from one edge—about 1 17/32" if you want to be picky, but I just eyeballed it—score a line with your knife. Repeat on the remaining three sides. These scoring lines are shown as dashed lines above. Then cut out the gray shaded sections. This is what the box bottom should look like:

The box lid is constructed the same way. Trim a swatch down to a 3" x 3" square. At a point slightly less than 1/2" from one edge, score a line with your knife. Repeat on the remaining three sides and cut out the gray shaded sections.

Fold each sheet on the scored lines, bending flaps inward and securing them with double-stick tape.

Make flowers from crepe paper


Materials:

Sheet of crepe paper
Small piece of cardstock
Scissors
Glue (I used Aleene's Tacky Glue)
Toothpick

Cut 12 circles from a sheet of crepe paper, any size you like depending on how big you want the final flower to be. I accordion-folded a strip of paper and cut multiple circles at once. No need to be too precise; freehand circles will do.

Orient each petal so the grain in the paper runs vertically. Apply a bit of glue at the bottom of the petal and pinch it to create small gathers. When the glue has dried, press both thumbs into the center of each petal and stretch the paper to curl the edges inward, forming a bowl shape.

Cut out a small circle of cardstock (about the same size as the petals before you shaped them.) Glue five petals around the outside edge. Then stagger four petals inside that ring, followed by three petals in the middle.

To make a center for the flower, cut a small strip of crepe paper and fold it in half. Cut notches along one long edge of the doubled paper to make fringe. Roll the fringed paper around a toothpick and secure with glue. Finally, glue this piece into the center of the flower.

Saturday, September 3, 2011

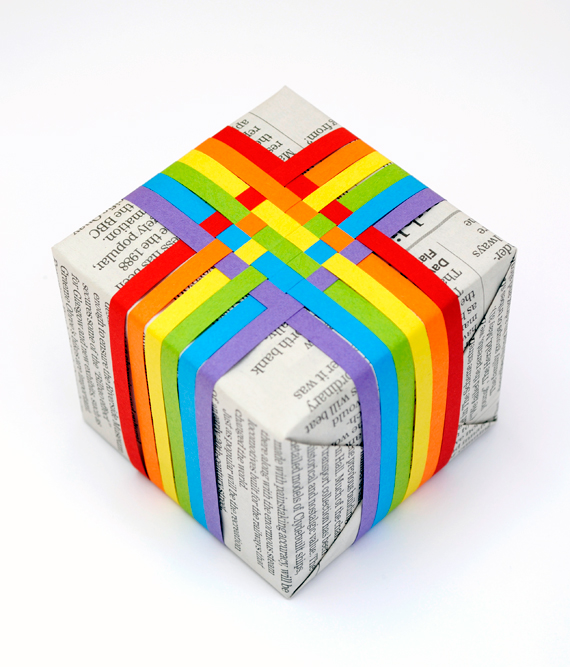
Woven paper gift topper


How-to
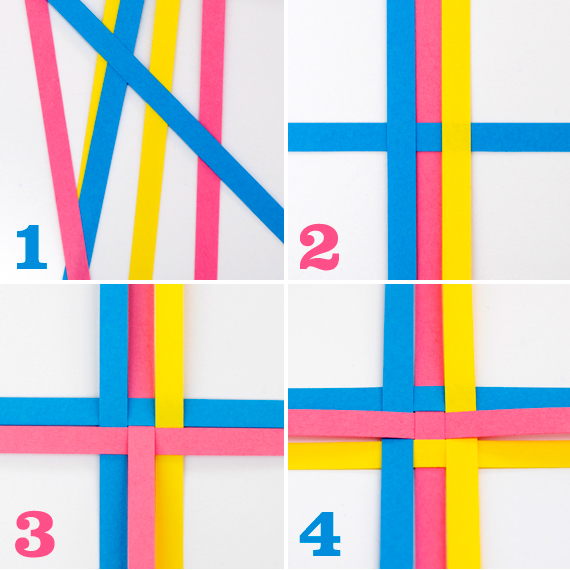
♥ Cut some strips of colored paper. Mine were 0.5cm wide. They need to be long enough to wrap around your gift. If you have a paper shredder then this might make the job even quicker!
♥ Line up your vertical strips on a table top…you can use a bit of sticky tape at one end to hold them in place while you weave away.
♥ Weave the horizontal strips into the vertical strips.
♥ Using a bit of sticky tape secure to your gift. Job done!

I also made a rainbow gift topper….no surprise there then!

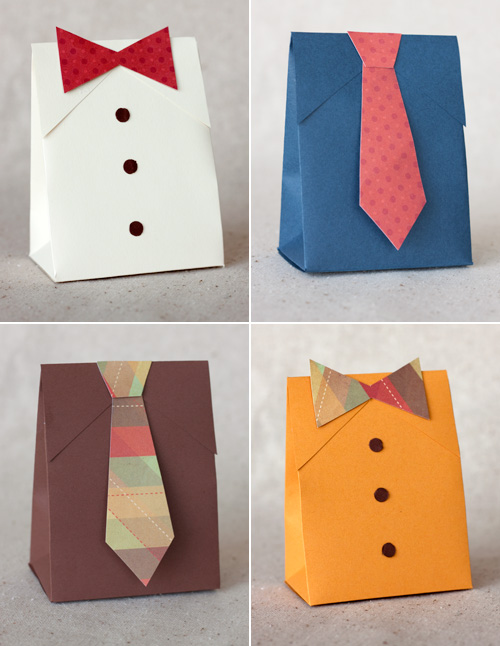
Father’s Day Shirt & Tie Gift Boxes


Supplies you’ll need:

gift box template + bow tie / necktie template

a printer
cardstock for the box and tie(s)*
scissors
a ruler
a pen or pencil
glue dots
double-sided tape
1/4 inch circle hole punch (for bow tie box)
a scoring tool (optional)
a cutting mat (optional)

Print the box template onto lightweight cardstock, cut out along the solid lines, and assemble according to the directions found in the template file. Place your gift in the box, and use double-sided tape or glue dots to securely close the flap. Print bow tie/necktie templates, cut out, and trace onto your choice of patterned or solid colored paper. Cut out the tie(s) and attach to the box flap using double stick tape or glue dots. If making the bow tie box, punch out three 1/4 inch “buttons” using a hole punch, and attach to the front of the box using glue dots (small Zots are the perfect size).

Alternative directions: Assemble the box and attach the tie to the top flap first, and add your gift last.

These boxes will hold a variety of small Father’s Day gifts, including watches, fishing lure, small food treats, gift cards, and tech gadgets like iPod Nanos or USB thumb drives.


Friday, September 2, 2011

DIY Gifts | Candy Poppers


Materials

tissue paper roll
double stick tape
scissors
1.75 x 5 piece of cardstock
ribbon
page of crepe paper
candy

Step One: Place double stick tape on crepe paper put tissue paper roll on tape and roll across crepe paper apply tape on end of crepe paper and secure.

Step Two: Twist one end of crepe paper and secure with ribbon, tie in bow.

Step Three: Fill roll with candy.

Step Four: Twist other end and secure with ribbon, tie in bow.

Step Five: Fold cardstock and cut on an angle, to create a “flag” look write message and attach tag to finished roll.


Wednesday, July 27, 2011

DIY Gifts | Summer-Inspired Favor Boxes


Materials
Paper Box from local craft store (not too thick)
Japanese hole punch
Fabric or paper flowers


Step 1:Gather you store-bought paper box (in a colors complimenting those of your wedding) your Japanese hole punch, and the flowers you'd like to use.

Step 2: Build your box, and become familiar with the piece that will be the top. Using your Japanese hole punch, punch several holes in the center of the top flap of the box.

Step 3: Separate the flower stems and feed 1-2 into each hole you've punched.

Step 4: Flip over the flap. On the inside of the box, cut the wire stems short and twist them into one stem so they don't hang down into the box and interfere with your favors.


Tuesday, July 26, 2011

DIY Gifts | Favor Flower pots


Nope, not just any old flower pot. We decided to give the typical (and cheap) terra cotta pots a fresh coat of paint... in your signature wedding color, of course! The best part: it's chalkboard paint! Write a note of thanks or use it as a place setting and scribble your guest's name. How convenient!

Materials
Terra cotta pot
Chalkboard paint
Paintbrush
Flowering plant
Chalk

How-to
Step 1 Buy your pot and pick your paint color (you can get pretty much any color you want!
Step 2 Give the pot a coat of paint. Set aside to dry.
Step 3 Add in a plant.
Step 4 Write your personal message!

Sunday, July 24, 2011

DIY Gifts | Washi Tape Containers


Materials
Washi tape
Scissors
Metal tins (or any container you like!)
Candy, nuts or any favorite treat

How-to
Step 1 Fill up the containers with your favors.
Step 2 Break out the washi and decorate those favor packages. Go on and work the tops and sides! Voila!

Thursday, July 21, 2011

DIY Gift | CREPE + LACE FAVOR CRACKERS


Supplies:

Cardboard tube about 4-5 inches long (paper towel rolls and wrapping paper tubes are good sources)
Lace fabric
Crepe Paper
Scissors
Double stick tape
Very sturdy thread or twine

Instructions:

1. Begin by cutting lace fabric and crepe paper into rectangles. The shortest side of the rectangle should be long enough to wrap around the tube - usually about 6-7 inches. The longest side should be the length of the cardboard tube plus an additional 6-8 inches. Once you've determined your dimensions write them down so all your favors will be uniform.

2. Wrap crepe paper and lace fabric around tube so that the lace fabric faces outward as shown. Secure with double stick tape. Then tie one end with twine. Fill with candy or other favor item and tie remaining edge closed.

3. Optional: Add stars or other adornments to all or a few of the favor crackers.

Tuesday, May 24, 2011

DIY Summer Snowflake Topper


SUPPLIES NEEDED:

  • cutting mat
  • ruler
  • x-acto knife
  • paper stock (Paper Source's 8.5x11 text in Starstream quartz was used for this project).
  • 38 gauge gold wire
  • glass beads
  • gold twine
SUMMER SNOWFLAKE TOPPER
1. Materials (see above list)
2. Cut wire to arms length and string a bead or two. Fold wire to desired length in half with bead(s) at the top of the fold (as shown)
3. Twist wire to center.
4. Continue folding and twisting in various lengths.
5. You should end up with an 8 point and 7 point snowflake (leave extra wire as shown)
6. Stack snowflakes and wrap together with extra wire.
7. Tuck, securing wire tail into the center.
8. Repeat steps 1 thru 3. To create a fuller center; string 3 to 5 beads together and twist into a petal. Switch between snowflake points (steps 1thru 3) and petals. Continue until you have reached desired fullness (leave extra wire as shown).
9. You now have one 15 point snowflake and center.
10. Stack snowflake and center then wrap together with extra wire.

Saturday, May 21, 2011

DIY Felt Ginger Cookie Ornaments


1. Gather your supplies. You will need white fabric paint in a squeezable bottle with a fine tip (I used Tulip brand, scissors, embroidery floss, embroidery needle, sequins (optional), and crafting felt (acrylic or wool) in brown tones (you will be able to make around nine ornaments for ever 9” x 12” segment of felt used). Print cookie template onto standard paper or card stock using the link found above or create your own freehand designs.
2. Using your scissors, cut out each printed paper template shape following the dark outer lines.
3. Lay paper templates one at a time on top of a single layer of felt. Carefully cut around each shape.
4. Repeat this process for each of the four template shapes. Once you have cut one of each shape from felt you can use your felt shapes as templates for additional ornaments.
5. Using your white fabric paint, squeeze a design onto your shape. This is how you “ice your cookies” so have fun with it. There is no right or wrong way to decorate your ornaments.
6. (optional) If you’d like you can add some extra sparkle to your cookies by applying sequins to the wet paint. Kids will love this part most of all. The sequins catch the light nicely and look wonderful hanging on a tree. Allow your ornaments to dry (this will take 1+ hours depending on how thick your paint is.
7. Once paint is dry, thread at least 8” of embroidery floss on your needle and stitch it through the top of your ornament once. Knot at the top of your ornament (next to the felt) then pull floss taught and tie ends together (this will form your loop for hanging). Trim the ends so they look neat.
8. Use your ornaments to decorate your tree and home, top gifts, and more. This is a great activity to do with a group of children (adults love it too). To make it user-friendly for all ages, pre-cut all ornament shapes and be sure to have plenty of paint bottles on hand. An adult will need to stitch the loop at the top of each ornament. Supervision should be used with little ones and sequins.

Wednesday, May 18, 2011

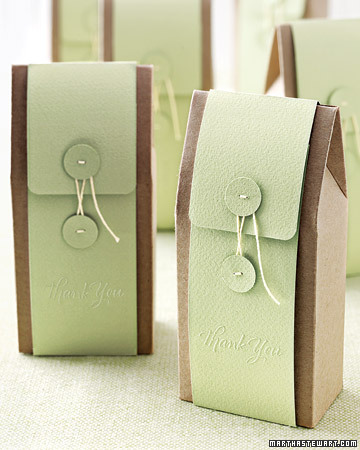
Making Gifts | Favor Bags


Cut paper strip long enough to encircle box and overlap slightly; round top corners with a craft punch. Wrap strip around box, folding where needed; emboss message.

Use 3/4-inch circle craft punch to cut two "buttons"; use a real button and needle to poke holes. With embroidery floss, sew paper buttons to strip, so they're about 1 inch apart. Wrap the floss around the buttons to close.


Tuesday, May 17, 2011

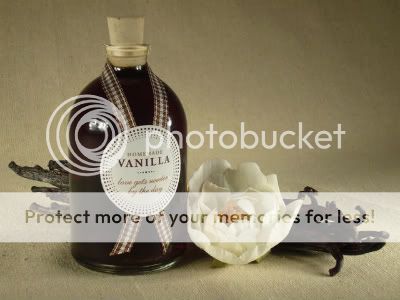
Making Gifts | Vanilla Favors


Materials:

Small Glass Jars
#4 Size Corks
Mini Gingham Ribbon
Sticker Paper
Scissors
X-acto Knife
Homemade Vanilla


Instructions:

1. For the Homemade Vanilla Extract follow the recipe from Elise, Simply Recipe and directions on how to make it.
2. For vanilla labels just like above, download Vanilla Labels here and print onto white sticker paper. Trim out each label. To get nice circles, take your time and use an x-acto knife and self-healing cutting mat - your fingers and table, or u can simply design your own label for it!
3. To get ribbon just like above, cut a 8" long ribbon and wrap around the neck of the bottle crossing in the center. Secure ribbon with a small piece of tape and then apply Vanilla label to the center of the bottle. Finish it off by snipping the ends of ribbon to a point.
4. Once Vanilla is prepared and ready, fill the jars with vanilla using a funnel and cap with a cork.

Monday, May 16, 2011

Making Gifts | Wine Bottle Gift Wrap


Materials:

1 old sweater (I scour the thrift stores!)

2″-3″ of Fabric

Sewing Machine, or needle and thread!

Fabric scissors

Ribbon, yarn, gift tags etc… for embellishment
1. Once sweater is washed, start by inserting the wine bottle into the sleeve of the sweater. The sleeve should start just below the top of your wine bottle. Mark the sweater with length of your bottle, pull out the wine and cut the sweater sleeve off.

2. Place your bottle on the small square of fabric and trace a faint circle around the bottle. Give yourself an extra 1/4″-1/2″ outside of the bottle. Cut out this circle.

3. Turn the sleeve inside out and pin your fabric to the cut end of the sleeve. Sew together. Turn right side out and voila!

4. To complete, thread yarn through the sweater, or affix ribbon.

Wednesday, March 30, 2011

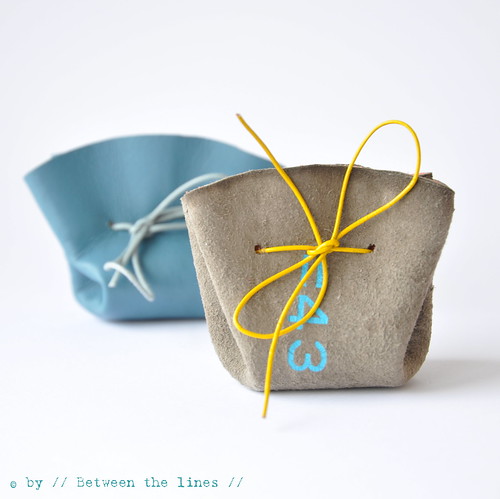
DIY Gifts | Simple Drawstring Coin Purse


what you'll need:

- leather scraps - or alternatively, any other material that will hold up, like felt, oil cloth, heavy weight cotton (which won't fray much in my opinion since it's cut in a circle)
- optional: fabric scraps and Vliesofix for the inside
- a plate, a dish or a bowl to trace the circle if you don't have a compass handy Note: for the purse in the above pictures, which is about 6cm wide and 6cm high, I used a dish with a 16cm diameter.
- leather shoe lace, ribbon, biais tape, ... for the closure
- a hole puncher
- iron
- scissors

Steps

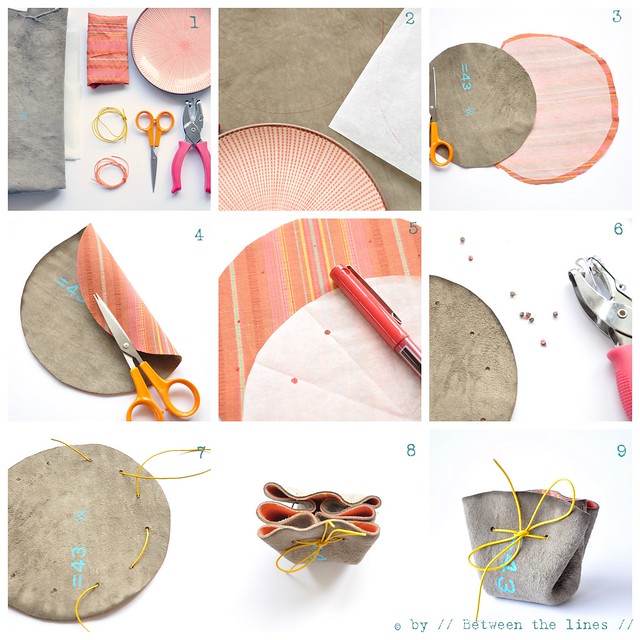
1. Trace plate, dish or bowl on the wrong side of the leather. Trace the same circle onto the paper backing of the Vliesofix, if you decide to line your little purse. ~ pic. 2
Note: for the purse in the picture I actually used the wrong side of the leather for the outside because I liked the number stamp on the back so much, the contrasting blue against the taupe color of the leather - and 43 also happens to be my age - double strike!

2. Cut out, however leaving an extra margin when cutting the Vliesofix. Iron Vliesofix onto the fabric. ~ pic. 3

3. Gently pull off the paper backing from the fabric. Do not throw away the paper backing as you'll still need it later. Iron the fabric onto the back of the leather. Next, trim the edges. ~ pic. 4

4. Take the paper backing and cut out the circle you traced onto it earlier on. You will now make 12 holes in it, about 1.5 to 2cm from the edge, and equally spaced out around the curve of the circle. In order to do this somewhat precisely, however without doing the math, what I did was fold the paper circle in half, next unfold again, punch holes at each end. Fold again, perpendicularly onto the first one (to make quarters), next fold open again and punch a hole on either side. Next, fold again, unfold, punch hole - basically you fold the paper same way you would cut a pie in 12 same size pieces. Once you've punched the twelve holes, place the paper on the wrong side (the lined sized, if you lined it) of your leather circle and mark the 12 holes with a pen. ~ pic. 5

5. With your hole puncher, punch the holes, using the marks as a guide. ~ pic. 6

6. Thread your ribbon, leather shoe lace, biais tape, ... through the holes. Pull both ends so to make folds and close the circle.

Tuesday, March 29, 2011

FLUFFY POM-POM TOPPER


Make a big statement with a fluffy pom-pom! Make it one color or two for different looks! Once the gift is unwrapped, it can also be used as a luggage tag!

For this project, you will need yarn (in the examples at the right, we use Wool-Ease Thick & Quick in Fisherman with Vanna's Glamour in Diamond for the gift at the left and Alpine Wool in Chili and Olive for the gift at the right) along with a pom-pom maker.

Step 1: Make your pom-pom. To make your pom-pom, follow the directions on the pom-pom maker package. Leave the strand of yarn used to secure the middle of the pom-pom long; you will use this to secure the pom-pom to your package.

Step 2: Tape the end of the yarn to your package and wrap it around the package several times in one direction. Cut the yarn and tape it to the back of the package. Repeat this step, wrapping the yarn around the package in the other direction.

Tie the pom-pom to the yarn wrapped around the package at the point where the yarn crosses the top of the package.